Monday, April 30, 2012

His Design 6” square
Updated  rnd 6 and 7 corners- 5/11/12


Front Post Double Crochet- FPdc
Instructions: yo, insert hook behind post of stitch (from front to back), yo, pull through, bring up even with last stitch completed, yo, pull through 2 loops, (2 loops on hook), yo, pull through rem 2 lps to complete stitch

Back Post Double Crochet -BPdc
Instructions: yo, insert hook into the back of your stitch (in other words from back to front), go in front of the post, pull through (3 loops on hook) bringing stitch up to height of previous stitch, yo, pull through 2 loops (2 loops remaining),
yo, pull through remaining 2 loops to complete stitch


No Begining Chain Double CrochetNBchDc  (also known as No turning ch dc stitch)
Video tutorial resource

Front Post Slip Stitch- FPSl st – remove hook from loop insert hook, from front to back, in between NTchDc and next dc st, grab loop with hook and pull through, do not yarn over to complete sl st. You will be making the NTchDc st in next rnd with that loop.

Back Post Slip Stitch- BPSl st- remove hook from loop on hook, turn work insert hook between beg ch and next dc st form back to front, grab loop and pull through to back. Do not yarn over to complete sl st. You will be making the NTchDc in next rnd with that loop.

 To Start- Ch 6, sl st to 1st ch to form ring,

Rnd 1
 ch3, 2dc, ch 1 into ring, (3dc, ch 1) 3 times. BPSl st to ch-3 beg ch.


Rnd 2
NBchDC, BPdc a second time around beg ch, *BPdc 2 times around each post, ch 2, * **FPdc 2 times around each of the next 3 posts of dc below, ch 2**
Repeat *to * into next 3 dc below, repeat ** to ** into next 3 dc below. FPSlst to the NBchdc in beginning of  this rnd.


Rnd 3
NBchDc , *FPdc in each post of previous rnd, ch 3 * Repeat * to * around. FPSlst to NBchdc.


Rnd 4
NBchDc, FPdc in each of the next 5 fpdc, *( ch2, trc around ch-2 and ch-3 of rnd 2 and 3 corners, ch 2) corner made, BPdc around each of the next 6 fpdc*  FPdc around each of the next 6 fpdc, Repeat * to *  FPSlst to NBchdc.


Rnd 5
NBchDc, FPdc around next 5 fpdc sts, *( ch2, dc in ch-2 sp below, ch 1, Dc in ch-2 sp below, ch 2) Corner made. BPdc in next 6 BPdc sts*, Repeat corner, FPdc around next 6 FPdc sts, repeat * to * , FPSlst to NBchdc.


Rnd 6
NBchDc, FPdc around next 5 fpdc sts, ( ch2, dc in ch-2 sp, ch2, [dc, ch1, dc, ch1, dc] all in ch-2 sp, ch2, dc in next ch-2 sp, ch2) corner made,* FPdc in the next 6 sts, repeat corner*.  Repeat * to*  3 times. FPSlst to NBchdc.


Rnd 7
NBchdc, FPdc in next 5 sts, ( ch1, dc in ch-2 sp, ch1, dc in next ch-2 sp, ch1, 2 dc in ch-1 sp, ch2, 2dc in next ch-1 sp , ch1, dc in ch-2 sp, ch1, dc in next ch-2 sp, ch 1) corner made. *FPdc in next 6 sts, repeat coner,*  Repeat * to * 3 times. Do a regular slst to NBchdc and bind off.


© Copyright April 2012 by Linda Carlson. All rights reserved. This pattern may not be
reproduced – mechanically, electronically, or by any other means, including
photocopying -- without the written permission of Linda Carlson. Projects made from this
pattern may be gifted, swapped or sold. If you use this pattern to sell items on the internet,
kindly credit Linda Carlson as the designer.


6" Flower burst 2
Worsted weight yarn (3 colors)
Size 5mm/F crochet hook (or whatever size you normally use)
Special stitches:
FPdc – front post double crochet: YO, insert hook from front to back around post of next st, YO and pull up a loop even with last st worked, and complete dc.
FPBN8 or 10--front post Bullion 8 or 10: Wrap yarn top to bottom toward you 8 or 10 times-as indicated by the number after BN-, insert hook from front to back around post of st indicated. YO pull loop through, YO pull loop through all loops on hook giving enough slack for bullion to stand up straight. (Do NOT ch 1 to close)
Rnd 1- Color A
Ch 6, sl st into first chain made to form ring. Ch 3, 11 dc into center of ring, sl st to 3rd ch of beg ch-3. (12 dc)
Rnd 2
Join color B with sl st to any dc, (ch 3, dc, FPBN8) in same st-(see special sts you will be working 2 dc in same st, then FPB8 around the post of the same dc) *(2 dc, FPBN8) all in next st* Repeat  from *to * around, sl st to 3rd ch of beg ch-3, being careful to hold yarn behind work and between bullion and beg ch to work the sl st. (24 dc, 12 bullions)
Rnd 3
Sl st in between next 2 dc, ch 3, dc in same st, ch 1, (skip bullion, 2 dc in between the next 2 dc, ch 1) all the way around, sl st to 3rd ch of beg ch-3. (24 dc, 12 ch-1 sps)
Rnd 4
Ch 1, sc in between next 2 dc, *FPBN8 around next BN from Rnd 2, keeping yarn behind hook and to the right of hook,  sl st back into the same sp as last sc just made, ch 2, FPBN8 around same BN, sc between next 2 dc keeping yarn behind hook as above. * repeat from * to * around, sl st to 1st sc. Fasten off color A. (24 bullions, 12 sc, 12 ch-2 sps)


Rnd 5- Color B
Join color B with sl st to any ch-2 sp from rnd 4, (ch 3, 3 hdc) in same ch-2 sp, (4 hdc in each ch-2 sp) around, sl st to 3rd ch of beg ch-3. Fasten off Color B-you may want to pull Color A through the last stitch made. (48 dc)
Rnd 6-Color A
Join Color A between 2nd dc of any 4 dc in rnd 5, ch 3, *(2 dc, ch 2, 2 dc) (corner made), *  ** FPBn10, hdc behind Bn, 4 hdc, FPBn8, hdc behind Bn, 4hdc, FPBn10, hdc in next st, ** (2dc, ch 2, 2 dc) *Repeat * to * 2 times,  then repeat ** to ** for last side and sl st to beg ch.
Rnd 7-Color B
Join Color B with sl st in any corner ch-2 sp, * (ch 3, dc, ch 2, 2 dc) in same sp (corner made), hdc, 12 sc across skipping hdc behind bullions,* repeat * to * three more times and sl st to beg ch.

© Copyright April 2012 by Linda Carlson. All rights reserved. This pattern may not be
reproduced – mechanically, electronically, or by any other means, including
photocopying -- without the written permission of Linda Carlson. Projects made from this
pattern may be gifted, swapped or sold. If you use this pattern to sell items on the internet,
kindly credit Linda Carlson as the designer.

Monday, April 23, 2012

His Design Devotional

I recently had to minister to one of the convalescent homes I go to and wasnt sure what God wanted me to bring as a message. I had something in mind but I really wasn't certain that was what God wanted me to minister on.
It wasn't until that morning that God revealed a message to me. I woke up with a crochet design in my mind. It was the design of a cross afghan square. I very excitedly got up, got out my yarn and crochet hook and got to it. While I was crocheting God brought the verse in Psalm 139 to mind. "You are fearfully and wonderfully made."
I finished the design and brought it with me as my visual aid and was so grateful for God's perfect timing and wonderful message.

In crochet you start with a foundation row, and with this square you work in the round starting in the center and working your way around. Working from inside to the outside.
That is kind of like how we are and God's design for us. He puts a substance in us, the foundation, when he creates us. He has a purpose and plan for us and it's a good one. Life can often throw things at us that could mess up that design, at least that is Satan's plan. However when we are saved God takes over. Sometimes as a result of sin in us and around us there are flaws in the design. Sometimes we try to decide what we think the design should be and try to create it ourselves. Then we fail and falter and it is only when we submit to God everything we are, is he able to take those mistakes, tangles and snarls in the design and fix them. God may have to do some ripping back to correct those places. "Ouch" is an understatement. Usually it's our pride that hurts, or things don't go along with what we pinned our hopes on and it hurts to realize that that was not the right dream God had in mind.
Sometimes we get stuck on a row because we don't understand where it is leading us. We don't see how going in this particular direction will fit into the whole design. I have followed patterns where I couldn't see how the design was going to look like the picture until several rows were done, because the rows build on each other and only made the whole design take shape when I finished the next row. That can be a scary place to be. The anxiety builds and worry sets in. Will it come out ok? What will it look like to others if I'm mess this up? I don't understand this next stitch (step), it doesn't seem right. We can get frustrated and want to put the whole thing away and hide it somewhere so no one will see. We can get to a place where we dont' make any progress at all because we just don't trust the directions and in turn trust the one directing.
God wants our trust but he will never force us to make the next step. He waits patiently, but sometimes has to give us a little nudge to get to the next level. The next row can only be started by somehow getting from the top of the previous row to the top of next row. Often we have to chain up to get the height of the next stitches for the new row. In life we don't always feel we are ready to take that step in the next level. We don't feel prepared. But we have to stretch ourselves a little and work that beginning chain. Taking a leap of faith to step out to where God wants us.
 And of course we all get frustrated sometimes when Jesus is on the inside working his way out but he is not showing through enough because our humanness often falls short. That is where we need the Holy Spirit to step in and fill the gaps, or support our previous efforts (stitches) to create the design God intended.

Jeremiah 29:11 For I know the thoughts that I think toward you, saith the LORD, thoughts of peace, and not of evil, to give you an expected end.

The expected end is God's whole design for us. One with peace in its works.The good news is God knows what he is dong. Phew! I certainly don't. I don't have a clue and can't see the future. Good thing because I think if I did I would cower in fear of some of those rocky paths ahead. Or tricky stitches in this case. :)


Pattern for this square coming soon.


Saturday, April 7, 2012


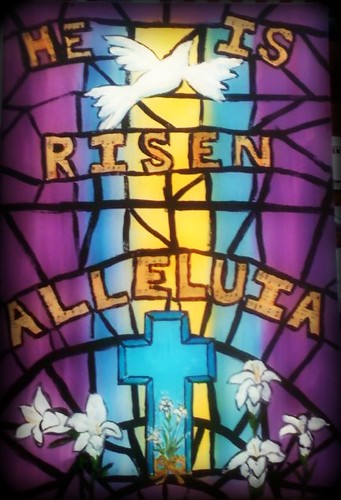
This is a picture of my painting. I used picasa to darken the edges of the photo.
Letters are actually sheet music from the song Christ the Lord Is Risen Today

Thursday, April 5, 2012

6" Flower Burst square


6" Flower Burst square      
Pattern currently being tested and edited


Worsted weight yarn (3 colors)
Size 5mm/F crochet hook (or whatever size you normally use)

Special stitches:
FPdc – front post double crochet: YO, insert hook from front to back around post of next st, YO and pull up a loop even with last st worked, and complete dc.

FPBN8--front post Bullion 8: Wrap yarn top to bottom toward you 8 times, insert hook from front to back around post of st indicated. YO pull loop through, YO pull loop through all loops on hook giving enough slack for bullion to stand up straight. (Do NOT ch 1 to close)

V-stitch: (fpdc, ch 2, fpdc) all in stitch indicated (worked as front-post-dc around top of bullions).

Rnd 1- Color A
Ch 6, sl st into first chain made to form ring. Ch 3, 11 dc into center of ring, sl st to 3rd ch of beg ch-3. Fasten off color A. (12 dc)

Rnd 2 – Color B
Join color B with sl st to any dc (ch3, dc, FPB8) in same st-(see special sts you will be working 2 dc in same st, then FPB8 around the post of the same dc) *( 2dc, FPB8) all in next st* Repeat *to * around, sl st to 3rd ch of beg ch-3, being careful to hold yarn behind work and between bullion and beg ch to work the sl st.. (24 dc, 12 bullions)


Rnd 3
Sl st in between the ch-3 & dc just made, ch 3, dc in same st, ch 1, (skip bullion, 2 dc in between the next 2 dc, ch 1) all the way around, sl st to 3rd ch of beg ch-3. Place marker in any ch-1 sp. (24 dc, 12 ch-1 sps)


Rnd 4
Ch 1, sc in between next 2 dc, V-stitch (see special sts) around top of next bullion, *skip ch-1 sp, sc in between next 2 dc, V-stitch around top of next bullion* Repeat from * to * all the way around, sl st to beg sc. Fasten off color B. (12 sc, 12 v-sts=24 fpdc, 12 ch-2 sps)


Rnd 5- Color C
Join color C with sl st to any ch-2 sp, (6 sc in each ch-2 sp) around, sl st to 1st sc. Fasten off color C. (72 sc)

Rnd 6- Color A
Working behind flower petals, join color A with sl st to any ch-1 sp in Rnd 3 (where marker was placed), (ch 3, 3 dc) in same ch-1 sp, (4 dc in each ch-1 sp) around, sl st to 3rd ch of beg ch-3. (48 dc)


Rnd 7
(Ch3, dc, ch 1, 2 dc) in same st (makes 1st corner), *(hdc, 9 sc, hdc) over next 11 sts,
(2 dc, ch 1, 2 dc) in next st (corner made)* Repeat from * to * 2 more times, (hdc, 9 sc, hdc) over next 11 sts, sl st to 3rd ch of beg ch-3. Fasten off color A. (36 sc, 16 dc, 8 hdc, 4 ch-1 sps)


Rnd 8- Color C
Join color C with sl st to any corner ch-1 sp, (ch 3, dc, ch 1, 2 dc) in same sp (1st corner made), *ch 2, skip next 2 sts, dc in next 5 sts, ch 1, skip next st, dc in next 5 sts, ch 2, skip next 2 sts**, corner as (2 dc, ch 1, 2 dc) in ch-1 sp*  Repeat from * to * 3 more times ending at ** on final repeat, sl st to 3rd ch of beg ch-3. (56 dc, 4 ch-2 sps, 12 ch-1 sps)

At this point if your square is 6 inches, fasten off. If it is not, you may work an additional round in this manner: sc in every dc, 2 sc in each ch-sp, (sc, ch 1, sc) in corner ch sps.
       
 (tested by Carleta3021)

© Copyright April 2012 by Linda Carlson. All rights reserved. This pattern may not be reproduced – mechanically, electronically, or by any other means, including photocopying -- without the written permission of Linda Carlson. Projects made from this pattern may be gifted, swapped or sold. If you use this pattern to sell items on the internet, kindly credit Linda Carlson as the designer.